
1800B BADGE-A-MATIC Instructions
SETTING UP:

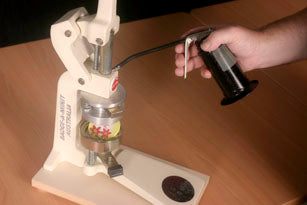
"The Model"
Ensure that you are in a comfortable position for working. Often, a stool allows you to gain a better leverage on the machine.
Before cutting the transportation tape holding down the handle, brace the handle to prevent it flying upward.
Work the hand levers a few times to get a "feel" of the machine prior to making a badge. This will reduce the chance of you spoiling badge components. It is almost impossible to "strain" the machine, so dont be concerned about pushing the levers too firmly. After making 5 - 6 badges, you will know how much pressure to apply to make a crimp.
NOTE: It is a good practice to tie the handle down if the machine is to be freighted around. This locks the top and bottom dies together and helps prevent them being knocked and misaligned.
MAKING A BADGE


Fig. 2.) "... the badge components consist of..."
STEP 1
Place the badge back, (with pin) in the lower die. The pin should be clasp side down. You will notice that the pin is offset in the pin back, so that the badge "hangs" correctly on clothing. Ensure that the pin sits "East-West" across the machine.
Next, place the metal disc on top of the badge back, edge down, convex front up.
Then, insert your artwork, laying it on top of the metal disc. Ensure that it is square to the fastening pin.
Finally, lay the clear plastic disc on top of your artwork. (Discard the protective paper interleaf). You are now ready to crimp your badge.
STEP 2

(Fig. 3.) "... pull the top lever down..."
Pull the top lever down to the limit of its travel. The lever will stop below the horizontal position, and you will see the top and bottom dies engage and "snap" together. Gently release the top lever (do not let it fly back to the vertical position). You will see that the badge back remains in the bottom die while the other components are in the top die.
NOTE: Very occasionally, the badge back sticks up into the top die. If it does, reach up and hook it out, replacing it in the lower die.
STEP 3

(Fig. 4.) "this step is essential"
With the tops of your fingers (both left and right hands) push the front of the badge right up into the top die. You will feel a soft "plop" as the components move into the correct position. Very little force is needed, but ensure that you use even pressure with your left & right fingertips. (Fig. 4.)
NOTE: This step is essential! It adjusts the crimping position to any thickness of artwork paper. If a badge is spoiled, the most likely reason is that this step was omitted. (Fig. 4.)
STEP 4

(Fig. 5.) "... push in the knob... and hold it in..."
With your left hand, push in the knob of the slide bar until it stops. CONTINUE HOLDING IT IN. DO NOT RELEASE IT.With your right hand, pull down the top lever to the limit of its travel. You will feel some resistance as the badge is crimpled. (Fig. 5.)
Now release both the slide bar and top lever.
Your badge is completed.
To eject the finished badge, you will see a small cap under the bottom die; push the upward and you badge will be able to be removed. (Fig. 6.)

(Fig. 6.) "... to eject the finished badge..."
NOTE: The slide bar is spring loaded and should slide freely.
It has only two operating positions:
FULLY IN for step 4
FULLY OUT for Steps 1, 2, 3.
If the slide bar knob is released during Step 4 and allowed to partially disengage, or, if it is not pushed fully in during this step, the machine may be damaged, and badges will not be properly formed.
MACHINE MAINTENANCE
(Fig. 7) "...a tiny drop of oil..."
After the first 50 or so badges, it is a good idea to apply a tiny drop of oil (engine oil or sewing machine oil; dont use solid stick dri-libe) to the top die shaft and pivot points. Use only the smallest smear of oil this will prevent machine becoming messy. Thereafter, a drop of oil every 1000 badges should suffice. If you want to permanently secure your machine to a work bench, remove the 5/16 screws which retain the pressed wood base and use the threaded hole to secure your machine.STORING YOUR MACHINE
If you are putting your machine away for some time, smear the curved working surface of the steel bottom die with Vaseline or oil. This will prevent corrosion. Remember to wipe this away when you come to re-use the machine.
If you want to permanently secure your machine to a work bench, remove the 5/16 screw which contains the pressed wood base and use the threaded hole to secure your machine.